| .vscode | ||
| cad | ||
| code | ||
| doc | ||
| img | ||
| pcb | ||
| production | ||
| .gitignore | ||
| LICENSE | ||
| README.md | ||
laserhead-distance-sensor
The problem
On my fiber laser, I have to manually set the focus of the laser by adjusting the height of the laser head which houses the focussing lens.
That means I have to accurately set the distance between the lens and the object with a ruler. This is very inprecise and requires a lot of fiddling with said ruler, the object and the calibration line on the laserhead.
A solution
I can create some sort of stick that has the exact height of the lens being in focus on the bed.
When I have to focus the laser, I try to fit this stick between the lens and the object and adjust the height accordingly.
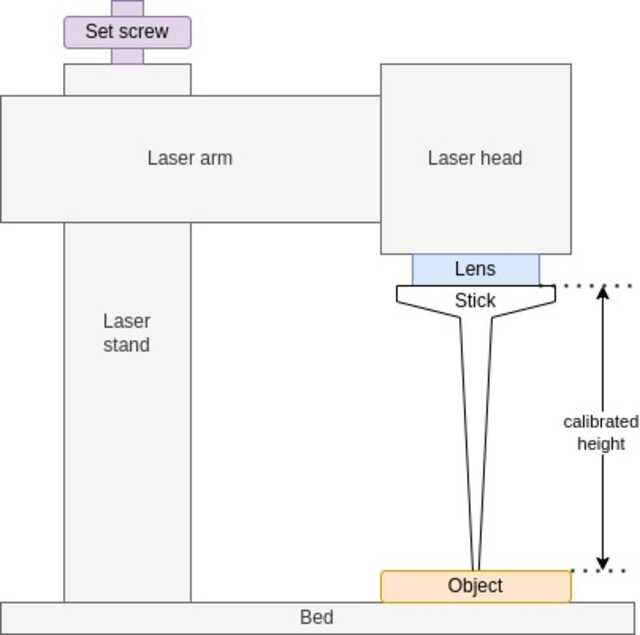
The solution
A digital distance sensor that helps to set the correct height for the galvo laser head of my fiber laser.
Because everything worth doing is worth overdoing!
Installation
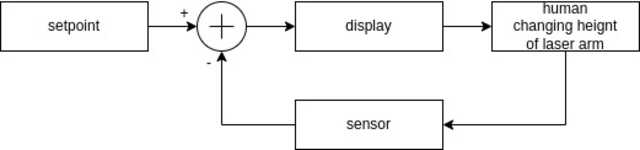
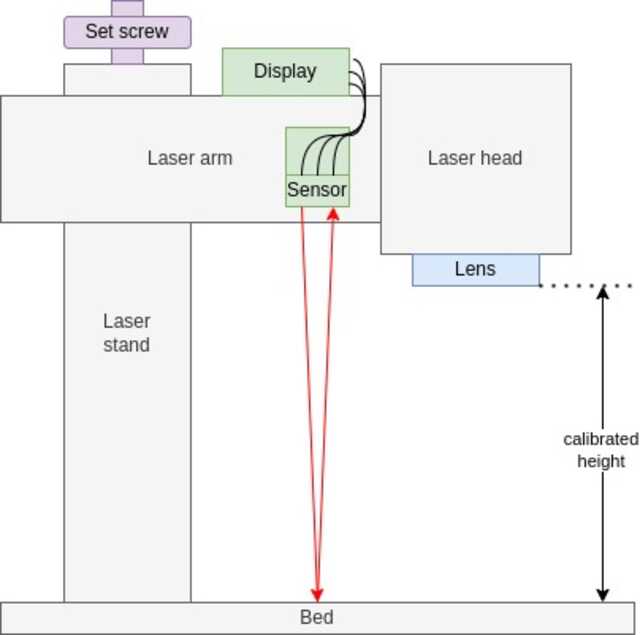
Installation is done by sticking the sensor to the side of the laser arm. The location is not important, but the sensor must be pointing down towards the bed. The height is not important, as the sensor will be calibrated to its current location.
The display can be attached wherever is most convenient and readable when adjusting the height of the laser arm.
After installation, connect the USB-C power source and verify the display is showing two numbers.
^ 127 | 0
Press the knob and the calibration menu will appear.
Calibrate
YES / NO
Rotate the knob so YES is highlighted and press the knob. The sensor will now take a measurement and store this in EEPROM. This measurement will be retrieved from EEPROM every time the sensor is started, so it starts in a calibrated way.
0 | 0
Note
If you change your lens, you have to recalibrate the sensor.
Operation
There are two ways of operating the sensor.
Option 1: Set object height
Rotate the knob till the right number displays the height of the object.
^ 8 | 13
The sensor will now calculate the difference between the measured height and the set height. (In the above example, the head must be raised by 8 mm to have the object of 13 mm in focus.)
Change the height of the laser arm till the left number displays "0" and no arrow is visible. The laser is now in focus.
Option 2: Measure object height
Rotate the knob till the right number displays "0".
v 5 | 0
Place the object under the sensor. (In the above example, the head must be lowered by 5 mm to have the object in focus.)
Change the height of the laser arm till the left number displays "0" and no arrow is visible. The laser is now in focus.
Note
I prefer option 2, because this is a quick and easy way of working. The set height of the object is lost after the power is turned off.
Build
To be documented.